
This is a complete and updated guide to grow russet potatoes.
Inside this article
- Things to consider before start.
- Step by step guide for growing russet potatoes.
- Pest and Dieses Control
- Commonly asked question.
- Lots more..
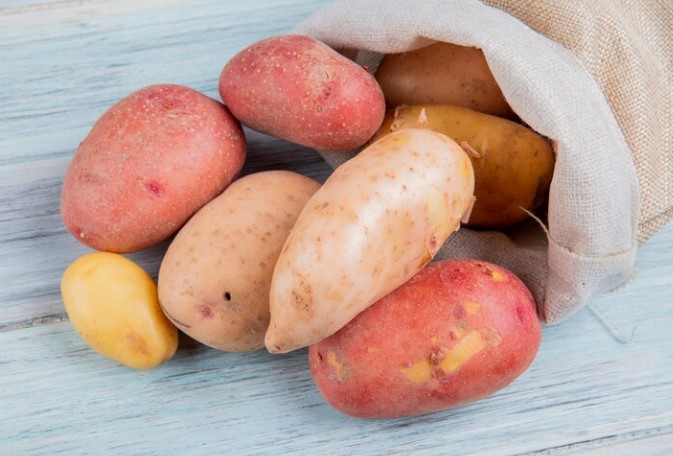
Did you know russet potatoes are the most cultivated potato species in the US? They are also called Burbank potatoes and Idaho potatoes. These potatoes are medium to large; they are slightly flattened, oval, or oblong. Additionally, they have a pale yellow flesh to white or medium to light brown russet-brown.
These potatoes grow in regions that have a temperate climate. The climate should have cool weather to favor the growth of these potatoes. Moreover, these potatoes prefer deep fertile soil and ample rainfall. The western United States weather conditions are suited for this potato.
Russet potatoes are ideal for fluffy and light mashed potatoes. They give a golden brown color and crisp texture when you fry them. That is why they are the best choice for baking. The fluffy texture and delicate flavor of baked russets taste well with various toppings. The toppings include chives, traditional sour cream, and spicy Latin and Mediterranean flavors.
In this article, We will talk about growing your russet potato. Keep reading the article to get well-detailed information. Let’s dive in!
When to Plant Russet Potato?
When growing your russet potato, it is vital to remember that potatoes like cool weather. Early in spring is the best time to plant your potato. It would be best to plant your russet potatoes three weeks before the last frost date to get the best results.
These potatoes also can thrive during cool autumn months. However, the temperature should be not greater than 26.70C or too low because it will lead to the freezing of the potatoes.
Things to Consider Before Growing Russet Potato
Before you plant your russet potatoes, there are several factors you need to consider. They include the following:
1. Basic potato knowledge
You need to have some basic potato knowledge if you plan to plant potatoes. Keep in mind that potatoes are common food in different countries. Each year millions of potatoes are grown and harvested. Moreover, potatoes are cheap, so people tend to care less for them when planted in the backyard.
Remember that the green region, flowers, and leaves of potatoes are very toxic. Having a basic knowledge of potatoes will ensure your planting process becomes easy. Additionally, you will learn to watch out for pests and diseases.
2. Companion planting
You will decide to plant companion crops for your plant or not. The advantages of a companion plant are increasing your potato yield and preventing insects from destroying your crop. Moreover, you can integrate these crops into your potato garden for a bountiful harvest. The companion crops include garlic, peas, beans, corn, thyme, and yarrow.
The reality is a companion plant will never harm your potato crops. Why not go ahead and take a leap of faith? You can try a few of the listed companion crops for your potato crops. You can be sure your potato yield will increase.
3. Eyes down or up
If you decide to go for seed potatoes, the rose end will have many eyes to form shoots. When it comes to laying turf, the green side is normally up for the potato shoots up. Before planting, ensure you leave four chits to get large potatoes.
You can also choose to plant them in the soil directly. Do not worry about which part is up or down; since potatoes have a lot of eyes, they will figure it out. Moreover, you can cut potatoes into chunks and each potato will have one eye. It would be best to cut the potatoes four days before planting to ensure callus form. It will help to prevent rotting.
4. Chit
Chitting your seed potatoes ensures they grow faster during the growth period. It is beneficial, especially if the growing season is shorter than the average growing season. Do not choose any old potato; choose a healthy one. However, for the best harvest, use seed potatoes.
Chitting breaks dormancy that supports shoots to emerge. It is done before planting. Normally the potato is left in the sun to sprout spuds before planting. However, if you decide not to chit the seed potatoes, you will plant them directly.
5. Where will you plant your potatoes?
The common answer to this question is your garden. You can also grow your russet potatoes in a natural woven basket, laundry basket, cardboard boxes, and five-gallon buckets. You can propagate your plant in Hugelkultur beds, straw bales, and raised beds. Therefore, if you do not have enough space, you can try this approach.
Russet potatoes do well in well-draining soil. It should be not too sandy, sticky-wet clay, and not rocky. Moreover, the green region of the plant needs the sun. The tubers in the soil need protection for them to grow well.
6. Watering
You can water your potatoes once or twice every week. Consistency is important for the overall growth of the crop; however, do not overwater it. When you overwater it can make the potatoes rot if the green part has died.
The best method to check to determine if your crop needs water is to look at the soil moisture content when watering. Watering your crop thoroughly and deeply is better than wetting only the surface, especially when irrigating potatoes.
Steps of Planting and Growing Russet Potato
The following are the steps involved in planting and growing potatoes. They include:
Preparing the soil
Potatoes need well-drained soil. Under wet and prolonged conditions, the potato will rot. If your soil has heavy clay or is poorly drained, you can use raised beds. Adding organic matter is the best way to improve your soil before planting potatoes.
Choosing a seed potato
You will choose a seed potato of the russet species. The seed potato can be bought when it has already germinated; hence it is ready to plant. It should have stubby eyes of two centimeters in length and healthy color, indicating regular and rapid growth. Moreover, some seed potatoes undergo germination in a single line facing upwards for more regular germination.
Planting
You will plant your potato seeds twelve inches apart and cover them with three inches of soil. When the shoots become twelve inches tall, you use a shovel to remove soil between the rows. You will mound the soil removed against the plants, which will bury the stems up to the middle. Moreover, you repeat this process during the growing season to ensure the tubers are protected.
Watering
You will water the plant one to two inches weekly between irrigation and rainfall. You should water the plant if you find that moisture content is low. Overwatering might lead to rotting; ensure you do not overwater.
Fertilizing
You can use bone meal in the beds; it has a high mineral content, increases microbes, and slow-release fertilizer. Moreover, you can use well-rotted manure and compost. If you do not want to use all-purpose commercial fertilizer, you can use seaweed or wood ash.
For the fertilization rate, you can apply your first batch two weeks after planting. After that, you apply once a month. It would be best to stop applying fertilizer two weeks before you start harvesting. During this time, the plant does not need water.
Harvesting
You should have a harvest date depending on the variety of potatoes you planted. You can mark that day in a calendar or your gardener planner. The signs that your crop will give you when harvesting time near includes the green part will die completely.
A spading fork and a shovel are the preferred tools for harvesting potatoes. If you use this method, some tubers will be sliced. You will not keep those potatoes, but you will prepare them to eat for dinner.
Another method of harvesting involves picking and you have to know the appearance of a ready potato. Moreover, if the potato skin is tough, the potatoes are ready for storage.
Read more: Top 10 Best Soil For Potatoes In Containers 2026 [Reviews, Guide & FAQs)
Pest and Diseases Control
Pests
a. Potato Tuber moth
These insects make bores in terminal shoots and petioles. They damage the potato in the field and storage.
Prevention
You can use pesticides to control pests. To protect your potatoes from these pests, store them in a well-aerated room. Moreover, you can cover the potatoes with two inches of sand.
b. Potato cutworms
These pests destroy the plant and the tuber. They like attacking young plants; the tubers will have boreholes.
Prevention
Mechanical destruction and good sanitation will reduce infestation. You can use insecticides and treat the soil using organic heptachlor to reduce infections. Moreover, you can do proper irrigation to reduce the effects of pests.
c. Aphids
These pests will suck juices and puncture the leaves. They also damage the young shoots and leaves, which leads to wilting and dry shoots.
Prevention
You can use insecticide to reduce the number of aphids. Also, you can do soil treatment using thimet. Moreover, you could encourage predators that like feeding on aphids such as ladybirds, beetles, or ahelinus.
Diseases
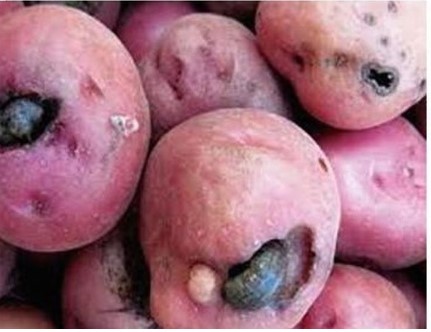
a. Black Heart
It is a disease found in stored potatoes mainly due to low oxygen levels and high storage temperature.
Prevention
You will plant your crops in well-drained soil to control this disease. Improve ventilation of your storage room, so there are optimum temperature and oxygen levels.
b. Black Scurf
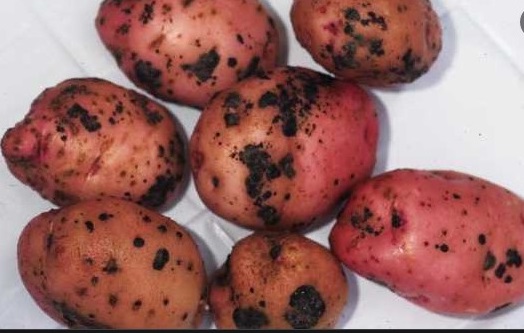
It is a fungal disease that infects the plant tissues and reduces tuber production. Infected tubers have black scurf that reduces tuber appearance. Moreover, high moisture and temperature encourage this disease.
Prevention
Make sure you use healthy tubers when planting. Also, treat tubers with agallol or aretan before planting. Treat your soil with Brassicol.
c. Viral diseases
Potato virus leads to a stipple streak. It affects plants during the early season. Furthermore, infected plants have mild mottling, spots, and rough leaves.
Prevention
Only use certified and healthy tubers. Do not use small tubers during planting. Moreover, regularly check the plants and cut the infected parts. Use organic sprays to control the disease.
Final Thoughts
In conclusion, growing russet potatoes is easy; you do not need to be an expert gardener. You only need to have the willpower and interest in gardening. Moreover, you need to be aware of the pest and diseases that attack this crop and how to prevent them.
Feel free to use this article as a guide to help you grow your potatoes. You can also share it with friends, family, and colleagues. Thanks for reading through the article.
Frequently Asked Questions (FAQs)
How long do russet potatoes take to grow?
It takes about 100 to 115 days for a russet potato to mature, depending on the growing conditions and variety. The potato will have netted skin texture and dark brown tubers.
When is the best time to plant russet potatoes?
When you want to grow russets, remember they are cool weather crops. Early spring is the best time to plant them when soil temperatures reach around 45–50°F.
Can I grow russet potatoes from store-bought potatoes?
Yes, you can. You will need to keep the sprouted potatoes and wait for the planting season in spring. Furthermore, when planting, ensure the soil temperature is 450C.
Can russet potatoes be grown in containers?
Yes, russet potatoes grow well in large containers or grow bags with enough depth, drainage, and sunlight.
What type of soil is best for russet potatoes?
Loose, well-draining soil rich in organic matter is ideal for growing healthy russet potatoes with good root development.